
What is proper squat form? A step-by-step guide
Key takeaways
- Proper squat form means feet shoulder-width apart, chest up, knees tracking over toes, and thighs reaching parallel.
- Stiff ankles are the hidden culprit behind most bad squats; the 5-inch knee-to-wall test reveals them in seconds.
- This is an explainer, not medical advice: stop if anything hurts and see a physical therapist or clinician.

Photograph: Nenad Stojkovic/Wikimedia Commons
Image Credits: Wikimedia Commons
A squat is the simplest strength move you own. You bend your knees and hips together, lower your body, and stand back up.
Proper form is the difference between a squat that builds your legs and one that strains your knees or back. The good news: the checklist is short, and most form problems trace back to one overlooked joint, the ankle.
This article explains proper squat form, including the step-by-step setup, the descent and the drive, the knee-to-wall ankle test most guides skip, common mistakes to avoid, and when to get help.
Step 1: set your stance
Stand with your feet about shoulder-width apart, or just outside hip-width if that feels more natural. Angle your toes slightly outward, roughly 15 to 30 degrees.
Physical therapist Jennifer, writing for Peak Endurance Physical Therapy, suggests a simple starting recipe: shoulder-ish width feet, slight toe-out, weight over the middle of your foot, not the heels and not the toes.
Lift your chest and keep your gaze straight ahead, not down at the floor. Squeeze your glutes once to square your hips before you move.

Photograph: U.S. Marine Corps photo by Lance Cpl. Phuchung Nguyen/Wikimedia Commons
Image Credits: Wikimedia Commons
Step 2: brace and descend
Take a deep belly breath and tighten your core, as if someone were about to tap your stomach. This brace protects your spine on the way down.
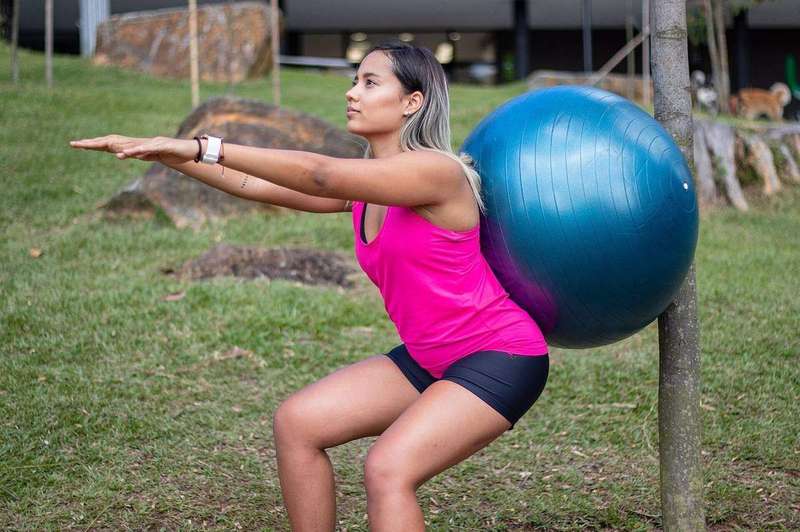
Push your hips back first, as if you are sitting into a chair behind you. Then bend your knees and hips together, keeping your knees in line with your toes. Your chest stays up and your back stays flat, with no rounding or over-arching.
Lower yourself until your thighs are parallel to the floor. Trainer Jillian Michaels, quoted by Parade, sets that same bar for beginners: aim for thighs parallel to the ground at the midpoint of the movement, and only go deeper if your mobility allows clean form.
Keep your heels planted the whole way down. Your weight should stay balanced across the full foot, heel, big toe, and pinky toe, not sliding forward onto your toes.
Step 3: drive back up
Push the floor away through your heels and midfoot. Drive your hips and knees up together until you are standing straight.
Squeeze your glutes at the top to lock the position in. Keep your chest up and your core tight as you return to standing, and do not lock your knees hard at the finish.
Then reset your breath and repeat. Start with bodyweight before adding any weights, since good positions have to come before heavy loads.
The knee-to-wall test your ankles need
Here is the part most guides skip. If your heels lift, your knees stop moving forward, or your chest tips over during the descent, limited ankle mobility is the likely cause, according to Men's Journal.
The knee-to-wall test finds out in seconds. Physical therapist Dr. Mike Reinold recommends it as a simple screen you can do without a specialist, and The Squat Bible lays out the standard: stand your big toe five inches from a wall, then drive your knee forward to touch the wall while your heel stays glued to the floor.
If your knee reaches the wall at five inches with the heel down and the knee over your toes, your ankle mobility is fine. The Washington Athletic Club adds useful cutoffs: five inches or more means good dorsiflexion (ankle's ability to bend the foot upward), while below three inches, or a big difference between sides, suggests mobility work is needed.
The club also gives a baseline number for what dorsiflexion means: about 10 to 15 degrees when measured formally. Stiff ankles, they note, force the knee, hip, and lower back to compensate, which wears those joints faster.
Photograph: PTPioneer/Wikimedia Commons
Image Credits: Wikimedia Commons
Common squat mistakes
Knees collapsing inward. This inward cave, called valgus, dumps pressure on the knee ligaments. Fix it by screwing your feet into the floor and pushing your knees out over your toes, per Sports Illustrated's squat guide.
Heels lifting off the floor. This usually means tight ankles, not bad technique. See the knee-to-wall test above before you blame your hips.
Chest dropping forward. Keep your chest up and your gaze forward. If your chest folds on every rep, the weight is too heavy or your stance needs adjusting.
Rounding the lower back. The "butt wink" at the bottom usually means you are squatting deeper than your mobility allows. Stop the descent where your spine can stay neutral.
Shallow reps. Half squats build half strength. Work toward parallel, and shorten the depth rather than breaking form to get there.
When to get help
This guide is for general information only. If squatting causes sharp pain, pinching in the hip or ankle, or pain that lingers after the session, stop and talk to a physical therapist or another qualified clinician.
The Washington Athletic Club makes the same point about nagging ankle or knee issues: if mobility work is not fixing the limitation, get checked by a professional. A short session with a coach or therapist can fix in weeks what a year of guessing cannot.
FAQ
How deep should I squat?
Aim for thighs parallel to the floor, the standard Jillian Michaels recommends for beginners in Parade. Go deeper only if you can keep your heels down, knees out, and spine neutral.
Should my knees go past my toes?
A little forward knee travel is normal and fine for most people. The rule that matters is direction: knees should track over the toes, not cave inward or flare outward.
Why do my heels lift when I squat?
Almost always limited ankle movement. Try the knee-to-wall test. If you cannot reach five inches with your heel down, mobility work on the calves and ankle joint is the fix, not a wider stance.
Can squats hurt my knees?
Squats with good form strengthen the muscles that protect the knee. Pain usually signals a form breakdown, too much load too soon, or an underlying issue worth getting assessed.
The bottom line
Good squat form is five things: a shoulder-width stance, a tight core, knees tracking over toes, thighs to parallel, and a drive through the whole foot. When the squat feels wrong, check the ankles first.
Start light, film a set from the side, and compare what you see to this checklist. Small corrections now are what keep you lifting for years.
---
Rive News's research desk writes practical explainers backed by public sources and expert guidance.
Related stories
- Baking soda and baking powder: what's the difference?
- How to handle toddler tantrums without yelling
- Foods toxic to dogs: the list, with reasons
Subscribe to the Rive News newsletter for one practical explainer every week.
© 2026 Rive News. All rights reserved.
Related stories
How long does it really take to build noticeable muscle?
Strength gains start in week one, but visible muscle takes 8-12 weeks for most beginners. What the Oklahoma CT-scan study measured,
Why you feel dizzy after a workout: the 5 common causes
Post-workout dizziness usually comes from a blood pressure dip, dehydration, or low blood sugar. The numbers behind each cause, and when
Why Do Knees Hurt When Squatting but Not Running?
Knees hurt when squatting but not running because deep bends multiply force on the kneecap. Learn the mechanics, common causes, fixes,