
What Is the Right Way to Caulk a Bathtub at Home?
Key takeaways
- Strip all old caulk first, since new sealant will not bond to old material.
- Fill the tub halfway with water so the joint is in its loaded position.
- Lay one steady bead, smooth it in a single pass, and let it cure about 24 hours.
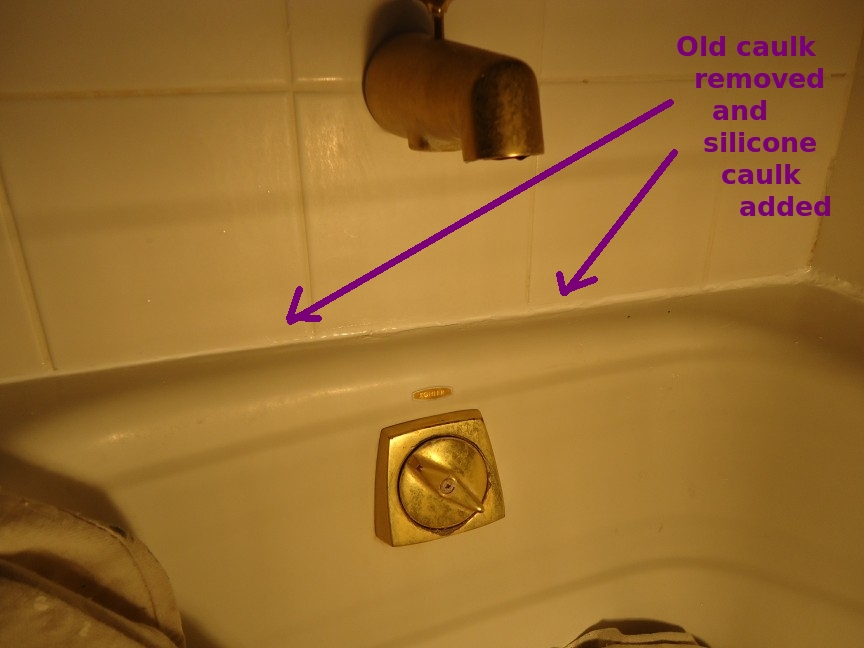
Caulk is the flexible sealant that closes the joint where a bathtub meets the wall. That joint moves a little every time the tub fills, drains, and warms up. A good bead of caulk moves with it and keeps water out of the wall behind the tiles.
A bad bead does the opposite. It cracks, peels, or traps moisture, and the damage hides until paint bubbles or the floor softens. The fix is not hard, but the order matters.
This article explains the right way to caulk a bathtub, including choosing the caulk, removing the old seal, cleaning and drying the joint, taping, laying the bead, smoothing, and curing.
What caulk does around a bathtub
The seam between tub and tile is a working joint, not a fixed crack. Water hits it every shower. The tub flexes under weight.
Temperature swings make the materials expand and shrink. Caulk fills that seam with a rubbery, waterproof strip that stretches instead of splitting.
When the seal fails, water slips behind the tile. It feeds mold, rots wood framing, and stains ceilings below. A fresh bead is cheap protection against repairs that cost far more.
If the wall already shows peeling paint near the tub, treat that as a warning sign and check the seal before repainting.
Caulk also has a limited life. Even a good job will age, and a yearly look at the seam catches trouble early. Dark spots, gaps, or a bead that pulls away from the tile all mean it is time to recaulk.
Pick the right caulk
For bathtubs, use 100% silicone or a silicone-latex blend sold as kitchen and bath caulk. A House in the Hills recommends either type and warns against basic paintable caulk, which is not built for wet areas and breaks down fast around a tub. Check the label for mold and mildew resistance before you buy.
The two types trade ease against durability. Pure silicone is the most waterproof option, stays flexible, and resists mold, but it is harder to smooth. A silicone-latex blend is easier to apply and cleans up with water, which makes it a friendly choice for a first attempt.
LePage adds one more factor: tub material. Its guide says silicone caulk is usually best for fiberglass bathtubs, while acrylic latex caulk is recommended for ceramic tubs. Either way, buy a tube labeled for tubs, sinks, or showers, not a general-purpose filler.
Gather tools before you start
A recaulk job stalls when you stop mid-bead to hunt for a tool. Lay everything out first. You need a utility knife or caulk removal tool, a putty knife or scraper, painter's tape, a caulk gun, a spray bottle or damp cloth, rubbing alcohol, and gloves.
TechBloat lists the same core kit and adds a caulk remover gel for stubborn old sealant. A hair dryer on low heat helps dry the joint in a humid bathroom. Keep a trash bag nearby for the old caulk strips.
Step 1: Remove every trace of old caulk
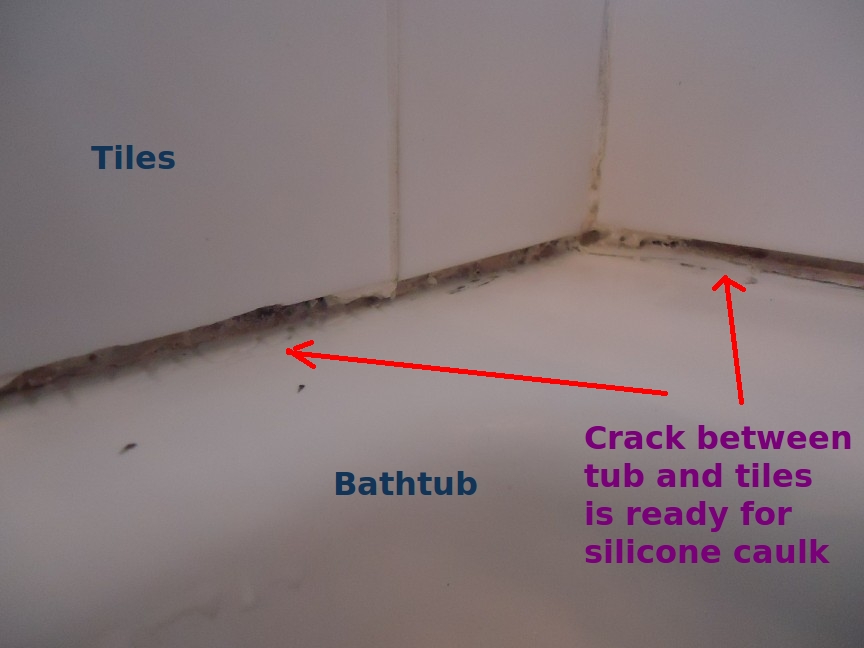
Cut along the top and bottom edges of the old bead with a utility knife. Lift the strip out with a scraper or putty knife, then go back over the joint to catch thin leftovers. A House in the Hills stresses that even a thin layer of old caulk can stop the new bead from sticking and cause peeling within days.
For stubborn residue, a commercial caulk remover softens the material so it scrapes away cleanly. LePage notes that removers are not compatible with every surface, so follow the product instructions and test a small spot first. Denatured alcohol or a paste of powdered cleaner and warm water can clear residue on painted or finished surfaces.
Step 2: Clean and dry the joint
Scrub the joint to remove soap scum, dirt, and mold buildup. Wipe it with rubbing alcohol and rinse well. If mold is present, TechBloat recommends treating the area with one part bleach to ten parts water, letting it sit a few minutes, then rinsing thoroughly.
Drying matters as much as cleaning. Moisture blocks adhesion, so let the joint dry fully before you move on. A House in the Hills suggests at least 30 minutes of drying after cleaning with rubbing alcohol.
While the joint dries, check the rest of the wet zone. A dripping shower head can keep the seam damp and undo your work, so fix leaks first. The joint must be dry to the touch when you start applying caulk.
Step 3: Fill the tub and tape the joint
Fill the bathtub at least halfway with water before you apply caulk. The weight pulls the tub down slightly and opens the gap to its loaded width. Caulk applied in this position sets in the shape the joint holds during real use, so it does not stretch and crack later.
Next, tape both sides of the joint. Place one strip of painter's tape just above the seam and one just below it, leaving a gap of about 1/8 inch between the strips. That gap is where the caulk will go.
Tape keeps the lines straight and stops the bead from smearing across the tile. Press the tape edges down firmly so caulk cannot creep under them. You will peel the tape off right after smoothing, before the caulk skins over.
Step 4: Cut, load, and lay the bead
Cut the tip of the caulk tube at a 45-degree angle. TechBloat puts the opening at about 1/8 inch wide, which matches the gap between your tape strips. A small opening gives you control, and you can always cut a little more if the flow is too thin.
Load the tube into the caulk gun and squeeze gently until caulk reaches the tip. Hold the gun at a 45-degree angle to the seam. Start at one corner and move in one smooth, steady motion to the far end, keeping pressure even.
Do not stop and restart mid-seam if you can help it. Stops leave gaps or lumps that weaken the seal. If the bead breaks, overlap the restart slightly and keep moving.
Step 5: Smooth once and let it cure
Smooth the bead right after applying it, while it is still soft. Run a wet finger or a smoothing tool along the bead in one clean pass with light, steady pressure. This presses the caulk into the joint so it bonds instead of sitting on the surface.
Do not go back over the same spot. A House in the Hills warns that over-smoothing pulls caulk out and leaves a weak, uneven finish. One pass is the rule.
Then leave the tub alone. A House in the Hills gives a cure time of 12 to 24 hours, and TechBloat notes full cure in 24 hours for many silicones. LePage says some products need up to 48 hours, so read your tube and follow its label.
Drain the water only after the caulk has set.
Gaps, mold, and other problem spots
Wide gaps need support before caulk goes in. For a gap too large for caulk alone, press a foam backer rod into the joint first, then caulk over it. The rod stops the caulk from sinking and helps it hold its shape.
Deep joints cause a different failure. Thick layers of caulk do not cure evenly and can stay soft inside. Fill the depth with a backer rod rather than piling on sealant.
Mold under the old bead must come out completely before you reseal. Sealing over mold traps it, and it will grow back through the new caulk. Clean, rinse, dry, and only then apply the new bead.
Mistakes that shorten the life of a caulk job
Applying new caulk over old caulk is the most common failure. The new bead cannot bond to the old one, so it peels. Skipping the cleaning step runs a close second, since soap scum and moisture block adhesion the same way.
Using too much caulk creates thick, uneven lines that are hard to smooth and slow to cure. A thin, steady bead beats a fat one every time. Rushing the cure is just as costly.
One more mistake is caulking a dry, empty tub. The joint is at its narrowest then, so the bead stretches every time someone takes a bath. Fill the tub, tape, and caulk in the loaded position.
Frequently asked questions
Can I caulk over old caulk to save time?
No. New caulk will not stick well to old material, and the joint will peel or leak. Strip the old bead fully, clean the joint, and dry it before you apply fresh caulk.
How long should caulk dry before I use the bathtub?
Most silicone caulk feels dry to the touch within a few hours but needs about 24 hours to cure fully. Some products need up to 48 hours, so check the label and keep the tub dry until the cure is complete.
Should I fill the tub with water before caulking?
Yes. Filling the tub halfway adds weight that pulls it down slightly and opens the joint to its loaded width. Caulk applied in that position does not stretch and crack when the tub is used later.
What if the gap between tub and tile is large?
Press a foam backer rod into the gap before caulking so the sealant has support. Do not fill a deep joint with caulk alone, since thick layers cure unevenly and weaken from the inside.
The bottom line
Caulking a bathtub is a short job with a long payoff. Strip the old seal, clean and dry the joint, fill the tub, tape both edges, lay one steady bead, smooth it once, and give it a full cure. Each step is simple, and skipping any one of them is what causes early failure.
Inspect the seam once a year and recaulk at the first sign of gaps, dark spots, or peeling. A fresh bead takes an afternoon and keeps water where it belongs. If you are tackling other bathroom upkeep, a squeaky floorboard or a sticking door can wait until the wet work is done and dry.
Tags: caulk, bathtub, bathroom, DIY, silicone
Latest in Home
- Is a Buzzing Light Switch Dangerous?
- How to Fix a Dripping Shower Head
- Why Does Paint Peel Off Bathroom Walls?
- How to Silence a Squeaky Floorboard
Subscribe to the Rive News newsletter for one practical how-to each week.
Related stories
Why Your Faucet Keeps Dripping After You Turn It Off
A dripping faucet is usually a worn washer, O-ring, or cartridge that can no longer seal. One drip per second wastes over 3,000 gallons
How to fix a running toilet without a plumber in 30 minutes
A running toilet can waste 200 gallons of water a day. Diagnose the flapper, float, or fill valve in two minutes, then fix it yourself

How to hang heavy shelves on drywall safely
Studs first, toggle bolts second, plastic anchors never for heavy loads. Weight ratings, installation steps, and mistakes that bring